Alright, that makes this a little easier. If you're going with something super bulky like a towel, be careful not to pull your fleece too tight, or it will bend. If you're going to turn thing inside out, it's best to leave a little excess for the fleece on all sides and sew along the edge of your absorbent pad. When you turn it inside out, you won't see the extra!
I almost always turn what I sew inside out. I prefer not seeing seam lines, but that's not for everybody! It is a lot of extra work, especially with something huge like a 1x5, and you need to know the ladder stitch in order to make things look pretty.
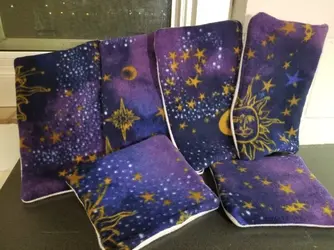
My personal advice it to turn it inside out. You end up with slightly more rounded corners that look like this:
View attachment 135185
And, it can be a bit puffy if you don't sew the middle down. However, I think it's the safest. All the stitching is hidden, so no piggies can bite or chew at it, and it reduces strain on the stitching as well.
To begin, cut your 1x5 measurements. Measure the bottom of your cage, and add 2 cm to each side. for example, a 35cmx23cm measurement will come out about 33x21 cm when turned inside out. For the fleece specifically, cut just a little bit on the wider side, to leave that edge that I mentioned to ensure you don't make it too tight.
Using TONS of pins and whatever you've got to hold it together, arrange them with the absorbent layer on the bottom, one of the fleece layers GOOD SIDE FACING YOU, and the final fleece layer BAD SIDE FACING YOU, GOOD SIDE facing the good side of the other fleece. Fleece likes to stretch, try not to let it do it too much. It will also bunch.
Your knots don't matter too much because they'll be hidden, but do make them nice, big, and strong!
To make a 1x5 with hand sewing, you'll have to start and stop repeatedly. It will take a very long time. You may want to consider making 5 1x1's on the larger side instead.
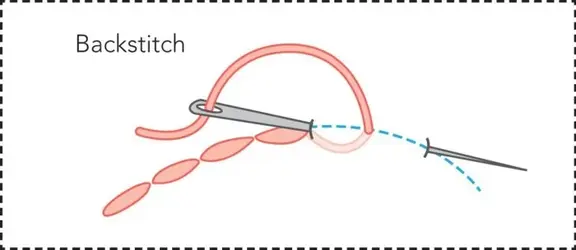
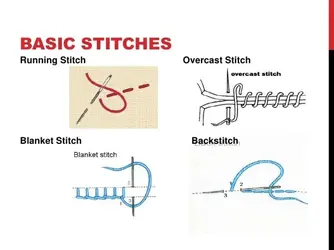
I would highly recommend using a back stitch or a running stitch. They're very beginner friendly, and if you draw a line on your fabric around the edge where you want your seam to be, they typically yield some high quality results. I used the back stitch for my beginner projects, and was able to pull and tug on them with all my strength(though it isn't much xD) without give.
View attachment 135186
One you've sewn around 3 of the side and a little of the fourth(I would recommend the short end, not the long), pull the piece inside out. It's like turning a giant sock inside out basically. Shove the rest of the material through the hole, and keep pulling and pushing until it gets all the way inside out. For a 1x5, I'd recommend a rather large hole to pull through, maybe about 15-20 cm. Wider if you're using a towel.
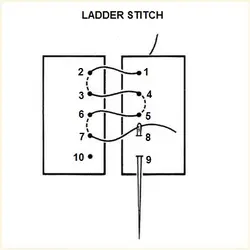
You'll notice the bunch and puffiness I mentioned while pulling it inside out. Getting rid of this will be the final stage. For now, using what's known as the ladder stitch to tie the ends off nicely. It can be a bit tricky around the corners, but it doesn't need to look perfect! The guinea pigs won't mind.
View attachment 135187
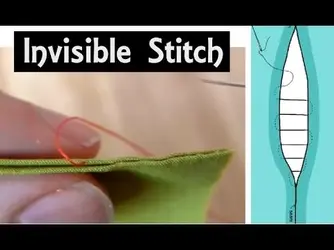
Note that the thread goes on top in the ladder stitch. This is an important distinction from the invisible stitch, where the visible parts are the small sections betwen 2 and 3, 4 and 5, and so on. Here's a video on the ladder stitch:
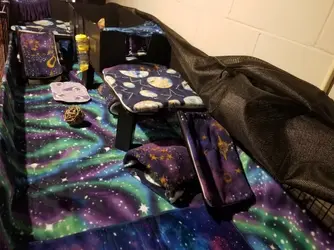
You should end up with something looking very similar to the celestial potty pads I made. In order to more firmly attach the top layer of fleece to the absorbent layer and the bottom, use an invisible stitch or a running stitch to run across the middle of the potty pad. Be careful not to bunch your fabric, or you won't be able to get rid of it! Again, pins are your best friend. I wouldn't recommend horizontally, but I've seen people do crosses, concentric squares, circles, vertical bars, anything that floats their fancy. A decorative design will flatten the fabric down just as much as a simple line, but in a different shape.
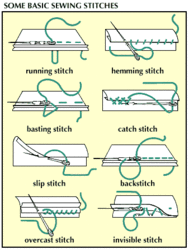
I've attached a few more images of basic stitches below. Do your best, and don't over work your hand! A long, sharp needle will also be a good friend to you. If you have any questions, feel free to ask me! I can try and post pictures too if you'd like. And if you want a SUPER flat one, the easiest way I found to do that is this:
Fleece bad side facing you, absorbent layer, fleece good side facing you. Make sure you have excess fleece, at least 1 cm, extending off of the absorbent layer. Use the back stitch to go all around the liner, with about .63-.31 cm seam allowance from the edge of the absorbent layer to your stitches. Be careful, as you must work your hardest to keep your stitches straight for both ways, or you can get some wonky lines and dips, although that's more of an aesthetic thing. Using either a ladder stitch or a running stitch, sew the excess edges of your fleece liner together. The finish will either look like slightly puffed edges around the liner, or a flat edge with visible stitches. Trim any excess fleece you don't want(You can make the seam as close or as far to the absorbent pad as you'd like, as long as it sels away access to the absorbent layer), and viola! You're done.
I hope this all helps!
View attachment 135188View attachment 135189View attachment 135190


