Building Advice

MunchMummy

Junior Guinea Pig
Joined
Feb 17, 2017
Messages
122
Reaction score
183
Points
275
Location
Isle of Wight, UK
Hi again everyone!

My 4 piggies are currently living in our conservatory but on hot days we pop them in their runs in a cooler part of the house.

We're now planning on moving them permanently into a cooler room and want to build them an awesome place to live that fits in with the furniture too.

I've looked at C&C but would prefer something a little more natural looking to fit with our wooden furniture and wanted to ask what building materials/woods etc and sealants are piggy safe.

Planning on it being open topped with larder levels etc just like a C&C but without the plastic look.

We were thinking initially conti board and plexiglass and perhaps aquatic sealant to waterproof it but obviously want to make sure it's super safe.

Any advice gratefully received.
 
Have a look on youtube. Piggiepigpigs, squeakdreams and carislittlepiggies all have some great cage building vids. Sounds like a wonderful project. Please keep us updated with your building progress.
 
Will do. Thank you. Have spent most of the last week getting ideas on youtube. Been measùring the space tonight and marking it out with tape on the floor. Keep saying to my husband "Do you think we can go even bigger?"

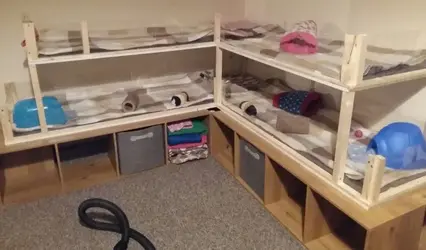
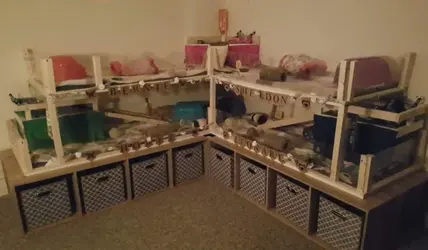
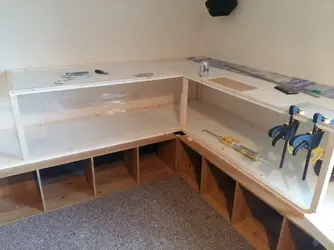
We've decided on a dual level L shaped corner unit with storage underneath and heaps of popcorning space. Boys on one level, girls on the other. With hayloft/larder for each. Also planning a little padded seat on either end for lap time cuddles!

Will post progress pics as we go!
 
Right. Once it is complete get on that ferry and come on over to mine! That is really fabulous.

Something just like that would do my three perfectly. Younwill be in demand all over the country when people on here see how lovely your set up is. Just remember I asked first!
 
Ah thank you flowerfairy! Can't take all the credit though as hubby is working super hard today doing all the building work! I'm just the one with the crazy ideas!

Will post more as we go...
 
Awesome! Look forward to progress pics.

I would love something that neat and tidy. I've recently built a C&C cage which I love for it's size but it's not the best looking thing!
 
Haha same with my c and c set up eileens mum. So much hay escapes through the grids ...
 
Haha same with my c and c set up eileens mum. So much hay escapes through the grids ...
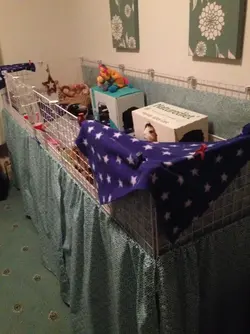
Cardboard covered in wipe down table cloth! That's what my mother in law did for my C&c. She first covered The cardboard in material to match the curtains round my cage then used clear tablecloth on top of it so it's wipe clean. I love my C&c.

IMG_2354.webp
 
Ah thank you flowerfairy! Can't take all the credit though as hubby is working super hard today doing all the building work! I'm just the one with the crazy ideas!

Will post more as we go...
Can't wait to see the finished cage. It will look amazing.
 
Thanks. It was my mother in law that did the makeover. She's brilliant.
Yours is great as well love the use of space.
 
That is utterly wonderful. I will be popcorning in a minute! I so want something like this. Would you be able to explain the building process? Did you have to use many tools? Was the perspex hard to cut and drill and how did you fix it?

Haha sorry for all the questions.
 
No problem!

I will explain as best I can but hubby is the expert!

It started with 2 x 4 drawer cube sto rage units and 2 single ones for depth, then the Base board was mounted onto this (screwed in). Then the wood supports/batoning were screwed in and the perspex screwed in sections onto that. All the screw holes were sunken in (Right term?) So that they are flush and won't catch a piggy. All the joints were then sealed with aquatic safe, non toxic sealant to stop wees etc creeping into cracks!

This method meant most of the wood (we used an bare, untreated white wood) is on the exterior and out of chewing reach!

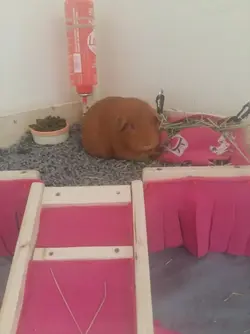
The boys have haylofts suspended from the upper floor to save space and to make cleaning out easier.

Apparently the perspex was a massive pain to cut and cracks were the biggest reason for going over budget as we wasted a lot. So many people online advise scoring and snapping but when you're cuting large pieces that doesn't work.

Hubby used his drill a lot and pre-drilled all the holes to prevent splitting. He also used a multitude of tools I don't understand! He used an electric saw for the wood, an electric sander to make sure everything was smooth and for the perspex he used what he describes as "the best tool in the world"...Black and Decker W300 Oscillating multi tool! It was only thing that did it!

I'm thinking though that if you know your measurements that you could get the wood and perspec pre cut to save a lot of the heavy electrical tools.

I hope that makes some sense! I can get hubby to write a better explanation if anybody wanted! I just spent most of the time seeing fleece things and making bunting!
 
Wow. That's certainly a piggy palace, no wonder they were popcorning.
 
It was so much hard work but totally worth it. Piggies are super happy and I get to see more of them and interact with them way more.

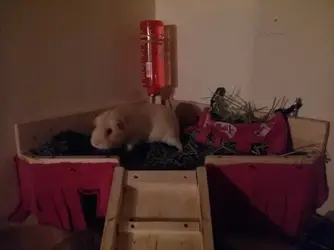
Had to fleece the girls' ramp yesterday as Sheldon refused to use it! She's got it sorted now! And had first big bedding change today which was much easier than before (apart from Howie the burrower being up to his tricks again!).

20170822_130351.webp
 
  • Like
Reactions: Tim
That is utterly wonderful. I will be popcorning in a minute! I so want something like this. Would you be able to explain the building process? Did you have to use many tools? Was the perspex hard to cut and drill and how did you fix it?

Haha sorry for all the questions.
I agree @flowerfairy. Doing zoomies around my office
 
Back
Top